Fiber Optic Patch Panel: 10 Best Options for 2025 Success
What is a Fiber Optic Patch Panel?
A fiber optic patch panel is a mounted hardware unit that organizes and manages fiber optic cable connections in a network infrastructure. If you’re considering purchasing one for your organization, here’s what you need to know:
| What is it? | A connectivity point that houses fiber optic cable terminations and adapters |
|---|---|
| Primary Function | Organizes, protects, and provides access points for fiber optic connections |
| Common Types | Rack-mount (1U-4U), Wall-mount, DIN-rail, High-density |
| Key Benefits | Centralizes connections, reduces downtime, simplifies troubleshooting |
| When to Use | Data centers, telecommunications rooms, network closets, industrial settings |
A fiber optic patch panel serves as the critical interface between your permanent fiber infrastructure and the active equipment in your network. Think of it as the organized hub where all your fiber connections meet – allowing for easy management, testing, and reconfiguration without disturbing your main cable runs.
Unlike switches or routers, patch panels are passive devices with no power requirements. They simply provide a secure, organized termination point for your fiber cables, protecting the delicate glass fibers while making them accessible for network changes.
Modern panels come in various configurations to suit different environments and density requirements:
- Rack-mount panels (1U, 2U, 3U, 4U) for standard 19″ data center racks
- Wall-mount enclosures for telecommunications closets with limited space
- High-density panels supporting up to 144 LC ports in just 2U of rack space
- Outdoor/industrial panels with NEMA ratings for harsh environments
The right panel depends on your specific needs for port density, physical space constraints, and future growth requirements.
I’m Corin Dolan, owner of AccuTech Communications with extensive experience designing and installing fiber optic patch panel solutions for businesses across Massachusetts, New Hampshire, and Rhode Island since 1993. My team specializes in creating scalable fiber infrastructure that supports your current needs while accommodating future expansion.

Why This Guide Matters
If you’re in the market for a fiber optic patch panel, you know that making the wrong choice can lead to headaches down the road—from insufficient capacity to compatibility issues with your existing equipment. Our guide provides straightforward comparisons and expert recommendations to help you make an informed purchase decision.
Whether you’re building out a new data center, upgrading your telecommunications room, or expanding your network infrastructure, this guide will help you understand:
– Which panel type fits your specific environment
– How to compare features that actually matter for your application
– Pro tips that can save you time and prevent costly mistakes
– Real-world considerations that product spec sheets often don’t mention
Let’s explore the details so you can select the right fiber optic patch panel for your network’s current and future needs.
What Is a Fiber Optic Patch Panel?
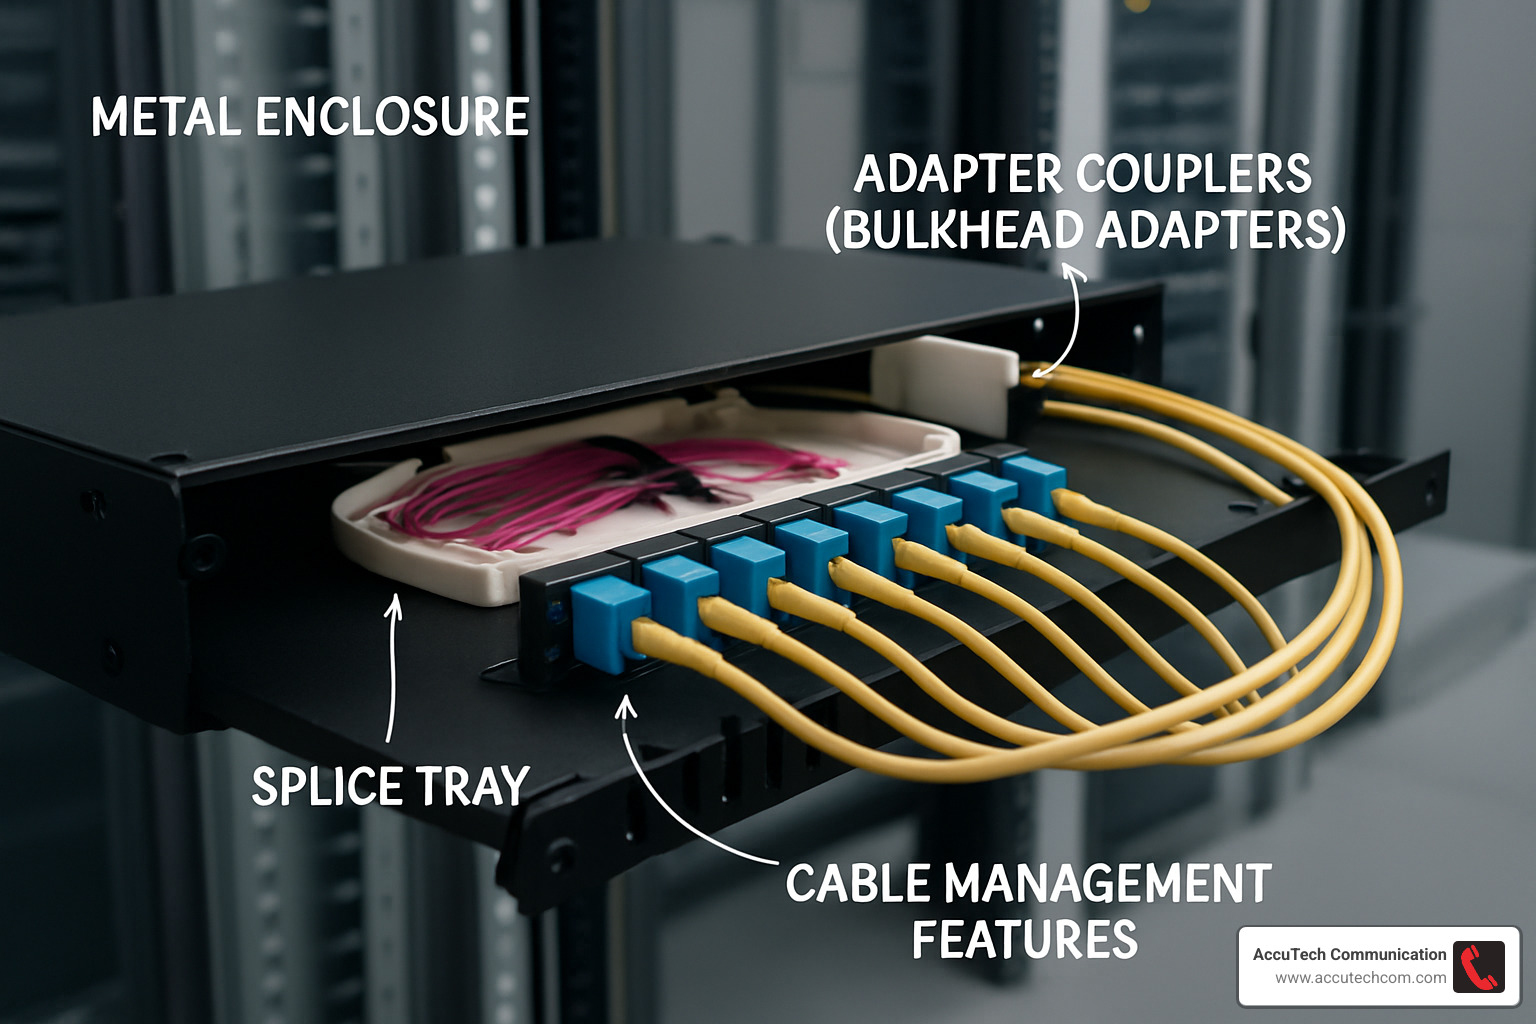
A fiber optic patch panel is an interface hub that provides a centralized point for terminating and managing fiber optic cables. It consists of a metal or plastic enclosure that houses adapter couplers (also called bulkhead adapters) which connect the outside network cables to the inside equipment cables.
Think of a fiber optic patch panel as the Grand Central Station of your network – it’s where all your fiber connections meet, allowing for smooth traffic flow between your permanent infrastructure and active equipment. Unlike switches or routers that require power and configuration, these panels are completely passive components – they silently do their job without electricity or programming.
When you’re browsing for panels, you’ll notice they’re measured in rack units (commonly abbreviated as RU or simply U), with each unit equaling 1.75 inches of vertical space. Most modern data centers use standard 19″ racks, though 21″ and 23″ options exist for specific applications.
Your fiber optic patch panel can accommodate both types of fiber connections:
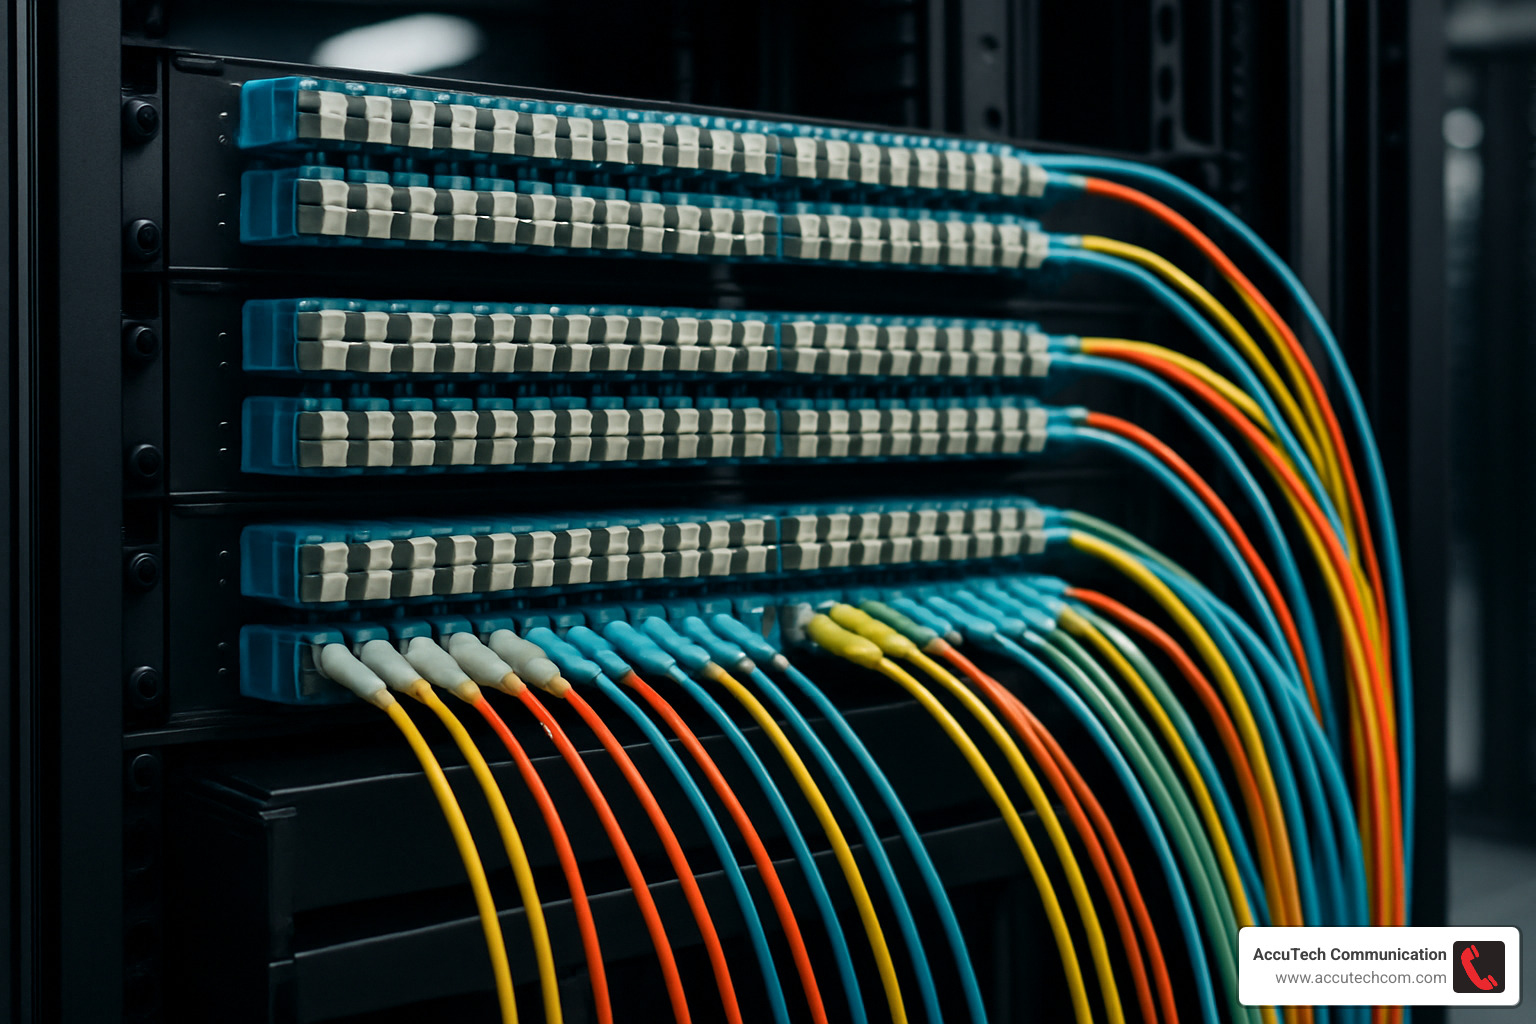
Single-mode fiber connections use a narrow core (just 8-10 microns) and excel at long-distance transmission beyond 2 kilometers. You can easily spot these on your panel by their yellow adapters – think of them as the marathon runners of your network.
Multi-mode fiber connections, with their wider core (50-62.5 microns), handle shorter distances under 2 kilometers. These are color-coded for quick identification – aqua for OM3/OM4, orange for OM1/OM2, and lime green for OM5.
One of the beautiful things about fiber optic systems is their complete immunity to electromagnetic interference (EMI). This makes them perfect for environments with electrical noise or when security is a top priority – fiber signals simply can’t be tapped without detection.
More info about Fiber Optic Cabling Installation
Primary Functions & Key Components
Your fiber optic patch panel is more than just a metal box – it’s a carefully designed system with several key components working together:
The enclosure or housing serves as the protective shell, available in various sizes to match your port density and mounting needs. Within this framework, you’ll find bulkhead/adapter panels that hold your fiber optic adapters – these can be fixed or modular to allow for future growth.
The heart of the system lies in the fiber optic adapters themselves. These clever devices connect two fiber connectors, allowing light signals to pass seamlessly from one fiber to another. Whether you’re using LC, SC, ST, or MTP/MPO adapters, they all serve the same essential purpose.
Inside many panels, you’ll find splice trays – dedicated areas where your main fiber cables connect to pigtails (those pre-terminated short fiber cables that make connections easier). For those seeking plug-and-play simplicity, cassettes offer pre-terminated modules that can be swapped in and out with minimal fuss.
To protect your delicate fiber strands, thoughtful cable management features like slack storage areas, bend radius protectors, and strain relief mechanisms prevent accidental damage. And don’t overlook the importance of labeling areas – these designated spaces for port identification will save countless headaches when troubleshooting.
A well-designed fiber optic patch panel performs several critical functions: it terminates your backbone cables, creates a clear boundary between outside and inside cabling, shields delicate connections from physical damage, organizes your fiber terminations, and makes testing and reconfiguration remarkably straightforward.
Benefits for Modern Networks
When we install fiber optic patch panels for our clients across Massachusetts and New Hampshire, they’re often surprised by the immediate improvements to their network operations:
Dramatic downtime reduction is perhaps the most valuable benefit. A properly organized patch panel system can cut network downtime by up to 30% by enabling faster troubleshooting. When issues inevitably arise, your technicians can quickly isolate and resolve problems without disrupting the entire network.
The flexibility these panels provide is game-changing for growing businesses. Need to reconfigure your network? Simply change the patch cords at the panel rather than pulling new cable runs through your building – saving both time and money.
I’ve personally seen clients transform their troubleshooting process after implementing organized patch panel systems. One of our Metro-west Boston clients reduced their problem resolution time from hours to mere minutes – a 40-60% improvement that directly impacted their bottom line.
Your expensive network equipment also benefits from port protection. By handling frequent connections and disconnections at the patch panel instead of directly at switches or servers, you significantly reduce wear and tear on those costly equipment ports.
For organizations concerned with compliance, properly implemented fiber optic patch panels help ensure your infrastructure meets industry standards like TIA/EIA-568, making certification and documentation straightforward.
Perhaps most importantly, these panels provide a foundation for scalability. As your business grows, an organized patch panel system allows for clean, structured expansion without creating a tangled mess that nobody wants to touch.
At AccuTech Communications, we’ve been designing and implementing these solutions since 1993, and the change in network reliability is remarkable every time. The organized approach simply works better.
Latest research on optical fiber
Best Fiber Optic Patch Panel Options for 2024
Choosing the right fiber optic patch panel for your organization can feel overwhelming with so many options available. Having installed hundreds of these panels across New England since 1993, I’ve learned what works best for different environments. Let’s look at the top choices for 2024 based on real-world performance and client feedback:
| Panel Type | Best For | Key Features | Port Density | Typical Applications |
|---|---|---|---|---|
| Rack-Mount 1U | Server rooms, small data centers | Space-efficient, slide-out trays | 12-48 ports | Enterprise networks, small ISPs |
| Rack-Mount 2U/4U | Large data centers | High density, multiple adapter plates | 72-288+ ports | Data centers, telecom providers |
| Wall-Mount | Remote offices, telecom closets | Compact footprint, secure door | 4-24 ports | Branch offices, retail locations |
| High-Density | Core network infrastructure | Ultra-high port count, MTP/MPO support | 144+ ports in 2U | Cloud providers, large enterprises |
| Industrial/Outdoor | Harsh environments | NEMA ratings, weatherproofing | 4-48 ports | Campus networks, outdoor installations |
Rack-Mount Fiber Optic Patch Panel Highlights
When it comes to data centers and server rooms, rack-mount panels are the workhorses of fiber management. These 19″ rack-compatible units are what we install most frequently for our Massachusetts clients who need reliable, accessible fiber connections.
What makes a great rack-mount fiber optic patch panel? It starts with accessibility. The premium models feature slide-out trays that let you pull the adapter field forward for easy access—a lifesaver when you’re trying to trace connections in a packed rack at 2 AM during an outage! We’ve seen technicians save hours of troubleshooting time with this simple feature.
Depth matters too, especially in older buildings around Boston and Worcester where telecom closets weren’t designed for modern equipment. Look for panels under 7 inches deep if you’re working with shallow cabinets or wall-mounted racks.
The best panels include thoughtful cable management features like front cable trays and rear spools that maintain proper bend radius (remember, kinked fiber is dead fiber!). And for future-proofing, choose panels with modular adapter plates that let you mix connector types or upgrade density without replacing the entire unit.
If you’ll be splicing fiber on-site, integrated splice tray compartments keep everything neat and contained. A typical 1U panel handles 24-48 LC connections, while 2U models double that capacity—perfect for growing networks.
Wall-Mount Fiber Optic Patch Panel Highlights
Not every fiber termination point has the luxury of rack space. For telecommunications closets, remote offices, or distributed connection points, wall-mount fiber optic patch panels provide secure, organized fiber management without requiring a full rack.
Security becomes especially important with these more accessible installations. The best wall-mount enclosures feature lockable doors and tamper-resistant hardware—crucial for panels installed in publicly accessible areas like school hallways or hospital corridors.
Environmental protection varies widely among wall-mount options. For standard office environments, a basic NEMA 1 enclosure works fine. Moving to a warehouse? Consider a NEMA 4 weatherproof model. Installing in a manufacturing plant with chemical exposure? NEMA 4X provides corrosion resistance that could save you from premature replacement.
Mounting flexibility is another key advantage. Quality enclosures offer direct wall mounting, pole-mount adapters for campus installations, or even DIN rail adapters for industrial control panels. Multiple cable entry points with proper sealing glands protect your valuable fiber from dust, moisture, and strain.
Throughout Massachusetts and New Hampshire, we’ve installed wall-mount panels in locations ranging from historic mill buildings to modern medical facilities, always matching the enclosure to the specific environmental challenges.
High-Density Fiber Optic Patch Panel Picks
As data demands increase, space efficiency becomes critical. High-density fiber optic patch panels deliver maximum connectivity in minimal rack space—perfect for growing data centers and enterprise networks.
The space savings are substantial: a well-designed 2U high-density panel supports up to 144 LC fiber ports (72 duplex connections) and can expand to 288 ports in the same footprint. That’s 50% less rack space than traditional panels would require for the same connectivity!
These high-density marvels typically use MPO/MTP backbone connections, which consolidate 12 or 24 fibers into a single connector. This technology supports rapid deployment of 40G/100G infrastructure—essential for organizations with growing bandwidth needs.
For clients in Boston’s financial district who measure network downtime in thousands of dollars per minute, we often recommend panels pre-loaded with OM4 multimode fiber, optimized for peak performance in 40G/100G environments. Despite their impressive capacity, many high-density panels maintain a compact depth under 7 inches, fitting easily into standard racks.
The challenge with high density is managing all those cables without creating a nightmare. Look for panels with advanced cable routing features that prevent congestion despite the high fiber count.
Industrial & Outdoor Enclosures
When your fiber connections need to brave the elements or harsh industrial conditions, standard commercial panels simply won’t cut it. Specialized fiber optic patch panels for industrial and outdoor use provide the protection needed for reliable connectivity in challenging environments.
Environmental ratings tell an important story here. For outdoor installations across New England’s variable climate, look for panels with IP65/IP66/IP67 ratings for serious dust and water resistance. Temperature tolerance from -40°F to +140°F ensures your connections stay reliable through brutal winters and summer heat waves.
Construction quality matters tremendously in these applications. Industrial-grade enclosures typically feature heavy-gauge steel or reinforced polycarbonate construction with powder-coated finishes to resist corrosion. Gasket seals prevent dust and moisture from compromising your critical fiber connections.
For manufacturing clients in Worcester and industrial campuses across New Hampshire, we’ve installed DIN-rail mounted fiber optic patch panels that integrate seamlessly with automation systems while withstanding vibration and harsh conditions. For outdoor campus deployments, pole-mount adapters allow installation on lighting poles or security camera posts, bringing fiber connectivity exactly where it’s needed.
Weather-tight cable glands or compression fittings maintain the enclosure’s environmental integrity while providing crucial strain relief for incoming cables—a small detail that can prevent costly fiber breaks during storms or temperature swings.
How to Choose, Install & Label Your Panel
Selecting the right fiber optic patch panel isn’t just about counting ports—it’s about creating a foundation for your network that will serve you well today and tomorrow. After helping hundreds of businesses across New England with their fiber infrastructure, I’ve learned that a little planning goes a long way.
Selection Criteria
When our AccuTech team sits down with clients in Massachusetts or New Hampshire, we start by understanding their network vision. How many connections do you need today? Where might you be in 3-5 years? Most organizations underestimate growth, which is why we typically recommend planning for 30-50% expansion from day one.
Port count is your starting point—panels typically come in configurations of 12, 24, 48, 72, or 144 ports. But don’t just count today’s connections; factor in that inevitable growth that comes with business success.
Connector type matters tremendously. LC connectors have become the standard for modern equipment thanks to their smaller footprint. SC connectors (the push-pull style) still show up in many legacy systems, while the bayonet-style ST connectors are increasingly rare but still found in older installations. For high-density data centers pushing 40G/100G speeds, MPO/MTP connectors are becoming essential.
Your mounting environment dictates the panel style. Most installations use standard 19″ rack-mount panels, but wall-mount enclosures work wonders in tight spaces like telecom closets. Industrial settings might call for DIN rail mounts, while outdoor installations need weatherproof ratings.
Fiber type compatibility isn’t something to overlook. Are you running single-mode (OS1/OS2) for those longer distances, or multi-mode (OM3/OM4/OM5) for shorter runs? Some environments need hybrid panels supporting both types.
Finally, think about access requirements. Wall-mounted installations typically need front-only access, while data center racks might allow front and rear access. Those sliding or pivoting trays might seem like a luxury until the first time you need to service a connection in a crowded rack!

More info about Fiber Optic Cable Installation Services
Step-by-Step Installation Checklist
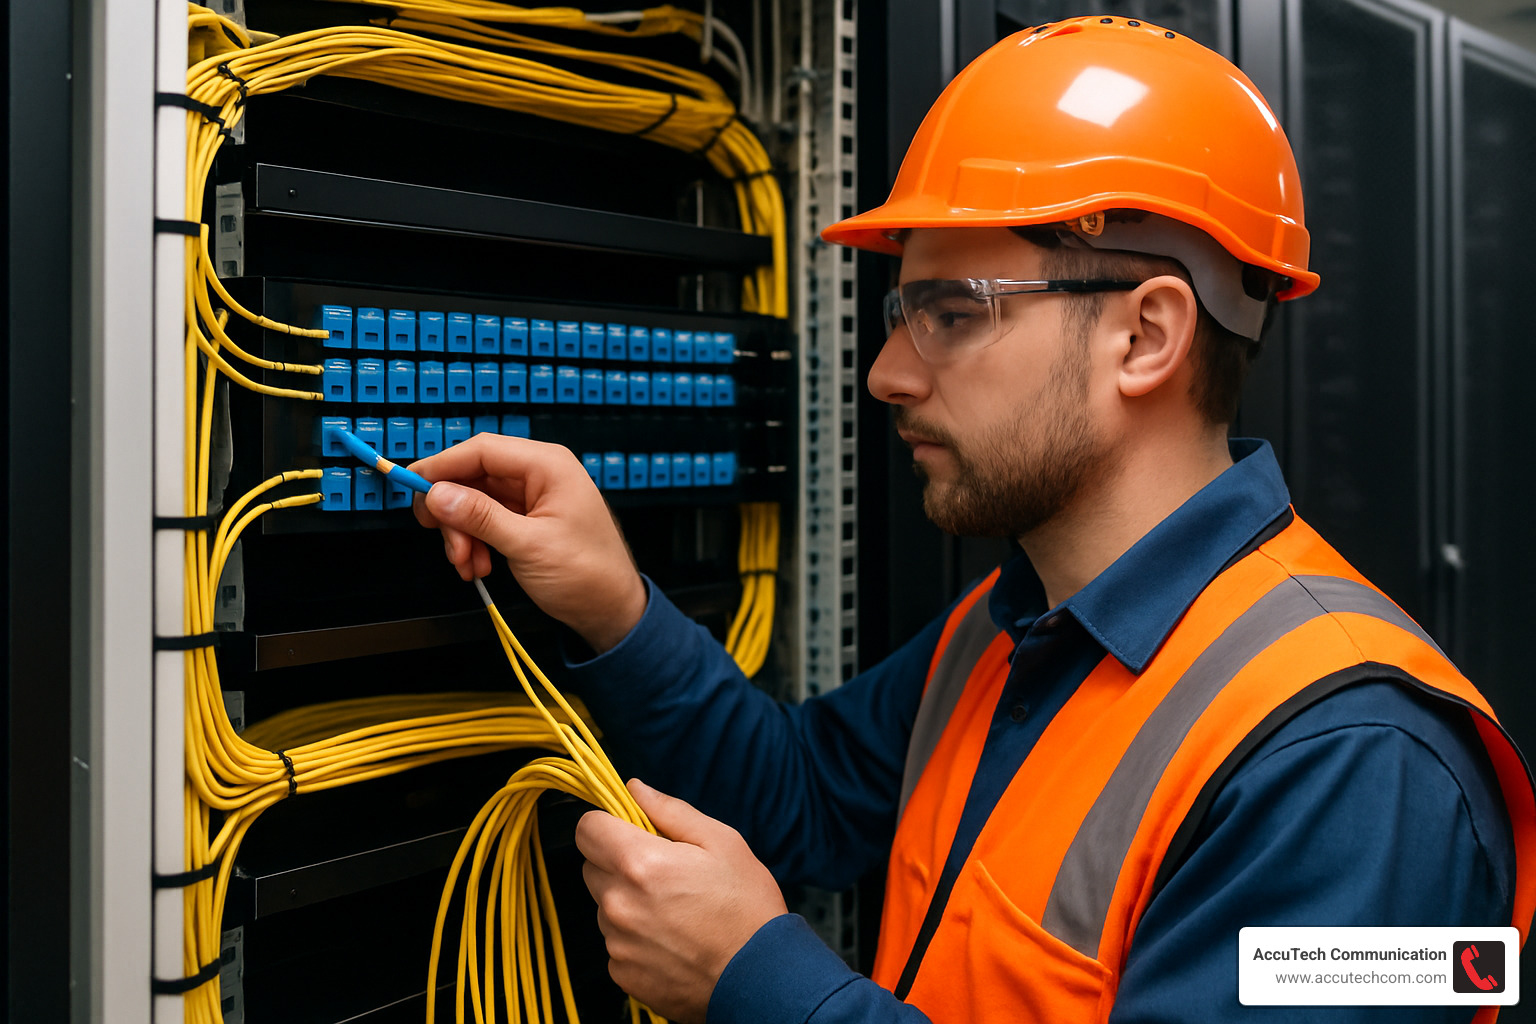
When our technicians arrive at a client site with their tool kits in hand, they follow a proven process that ensures reliable performance for years to come:
Preparation is where success begins. We verify the rack or wall space, ensure we have the right tools (cleaver, fusion splicer, cleaning supplies), map out port assignments, and create a logical labeling scheme. A quick inventory check confirms all components are present—the panel itself, adapters, and splice trays.
Mounting the panel comes next. For rack-mounting, we secure the panel with appropriate screws at the desired height. Wall-mounts need proper anchors suited to the wall material. We always ensure proper clearance for cable routing and future access—a cramped installation becomes a headache during maintenance.
Cable preparation requires patience and precision. We route the backbone cable to the panel, always leaving a service loop for future adjustments. The cable gets secured to strain relief points (never skip this step!), then we carefully strip the outer jacket and organize the fiber tubes or strands.
For termination, we generally recommend pigtail splicing for best performance. This involves preparing the splice tray, cleaving and fusion splicing each fiber to color-matched pigtails, securing the splices properly, and routing pigtails to their adapter positions. Field termination is faster but typically results in higher loss values.
Testing and certification isn’t optional—it’s essential. We clean all connector end faces (the #1 way to prevent problems), test each connection with power meters or OTDRs, document the results, and verify every connection meets specifications. This baseline documentation proves invaluable during future troubleshooting.
The final steps include installing dust caps on unused ports (dust is fiber’s enemy), securing all doors and covers, applying clear labeling, and completing documentation including test results.
Common Mistakes to Avoid
Over my years installing fiber optic patch panels across New England, I’ve seen the same issues crop up repeatedly. Avoiding these pitfalls will save you time, money, and frustration:
Dirty connector end faces are the leading cause of fiber problems, bar none. Always clean connectors with appropriate fiber cleaning tools before making connections. No exceptions, even with brand new components.
Exceeding bend radius limits can silently degrade your network. Fiber cables typically need a minimum bend radius of 10 times their diameter. Push beyond this, and you’ll induce signal loss or even break fibers. Those tight corners might look neat, but they’re killing your performance.
Poor labeling becomes painfully apparent during your first troubleshooting session. Every connection should be clearly identified at both ends, with consistent naming conventions. What seems obvious during installation becomes a mystery six months later without proper labels.
Mixed polarity issues create frustrating problems. Fiber connections have polarity (A-to-B, A-to-A, etc.), and mixing types causes failed links. Maintain consistent polarity throughout your installation and document it clearly.
Insufficient strain relief leads to tension on connections, gradually degrading signals or breaking fibers over time. Always properly secure cables at every transition point.
Overfilling cable management pathways crushes fibers and forces them beyond their bend radius limits. Allow appropriate space for each cable, even if it looks less tidy than cramming them together.
Pro Cable-Management & Labeling Tips
The difference between a professional fiber optic patch panel installation and an amateur one often comes down to cable management and labeling. Here’s what sets our AccuTech installations apart:
Color-coding provides instant visual information. We follow TIA-598-C color coding standards for fiber identification and often use different colored patch cords for different applications or zones. Color-coded labels or icon systems allow quick visual identification without having to read every label.
For bundling cables, we always use Velcro ties rather than zip ties to prevent compression damage. Cables get bundled in logical groups—by destination, type, or function—and we maintain proper spacing between bundles for airflow and accessibility.
Slack management requires finesse. We create service loops of appropriate length (typically 1-3 meters) and store slack in dedicated management trays or loops. Tight coils are never acceptable—we always maintain proper bend radius in any slack storage.
Our comprehensive labeling system includes labels on both ends of every cable showing source, destination, and unique identifier. We use wrap-around labels behind wall plates and patch panels for permanence and create detailed port maps with digital documentation. For larger installations, barcodes or QR codes link to digital asset management systems.
Finally, our documentation practices include maintaining as-built drawings showing all fiber runs, detailed port assignment spreadsheets, documented test results for each strand, and immediate updates after any changes. This living documentation becomes a valuable asset for your IT team.
Maintaining & Troubleshooting Your Investment
A fiber optic patch panel represents a significant investment in your network infrastructure. The good news? With proper care, these panels can serve your organization reliably for decades. I’ve seen well-maintained panels from the early 2000s still performing flawlessly in data centers across Massachusetts.
Preventative Maintenance Schedule
Think of your fiber optic patch panel like your car—regular check-ups prevent major problems down the road. At AccuTech Communications, we’ve developed a maintenance rhythm that works:
Monthly, take a quick walk-through and visually inspect your panels. Look for anything obviously wrong—damaged enclosures, cables bent too tightly, or missing dust caps on unused ports. It’s also a good time to make sure all your labels are still readable. This simple 5-minute check can catch issues before they become problems.
Quarterly, set aside time for a more thorough cleaning. Those connector end faces on active connections need regular attention—they’re like the windows light passes through, and even microscopic dirt can cause big problems. While you’re at it, wipe down the enclosure, check that all mounting hardware is secure, and if you have outdoor enclosures, verify those door seals are intact.
Once a year, schedule a comprehensive inspection. This is when we test optical power levels on your critical connections, peek inside splice trays to ensure everything’s still routed properly, and update your documentation. It’s also the perfect time to check for any stress points where cables enter the panel.
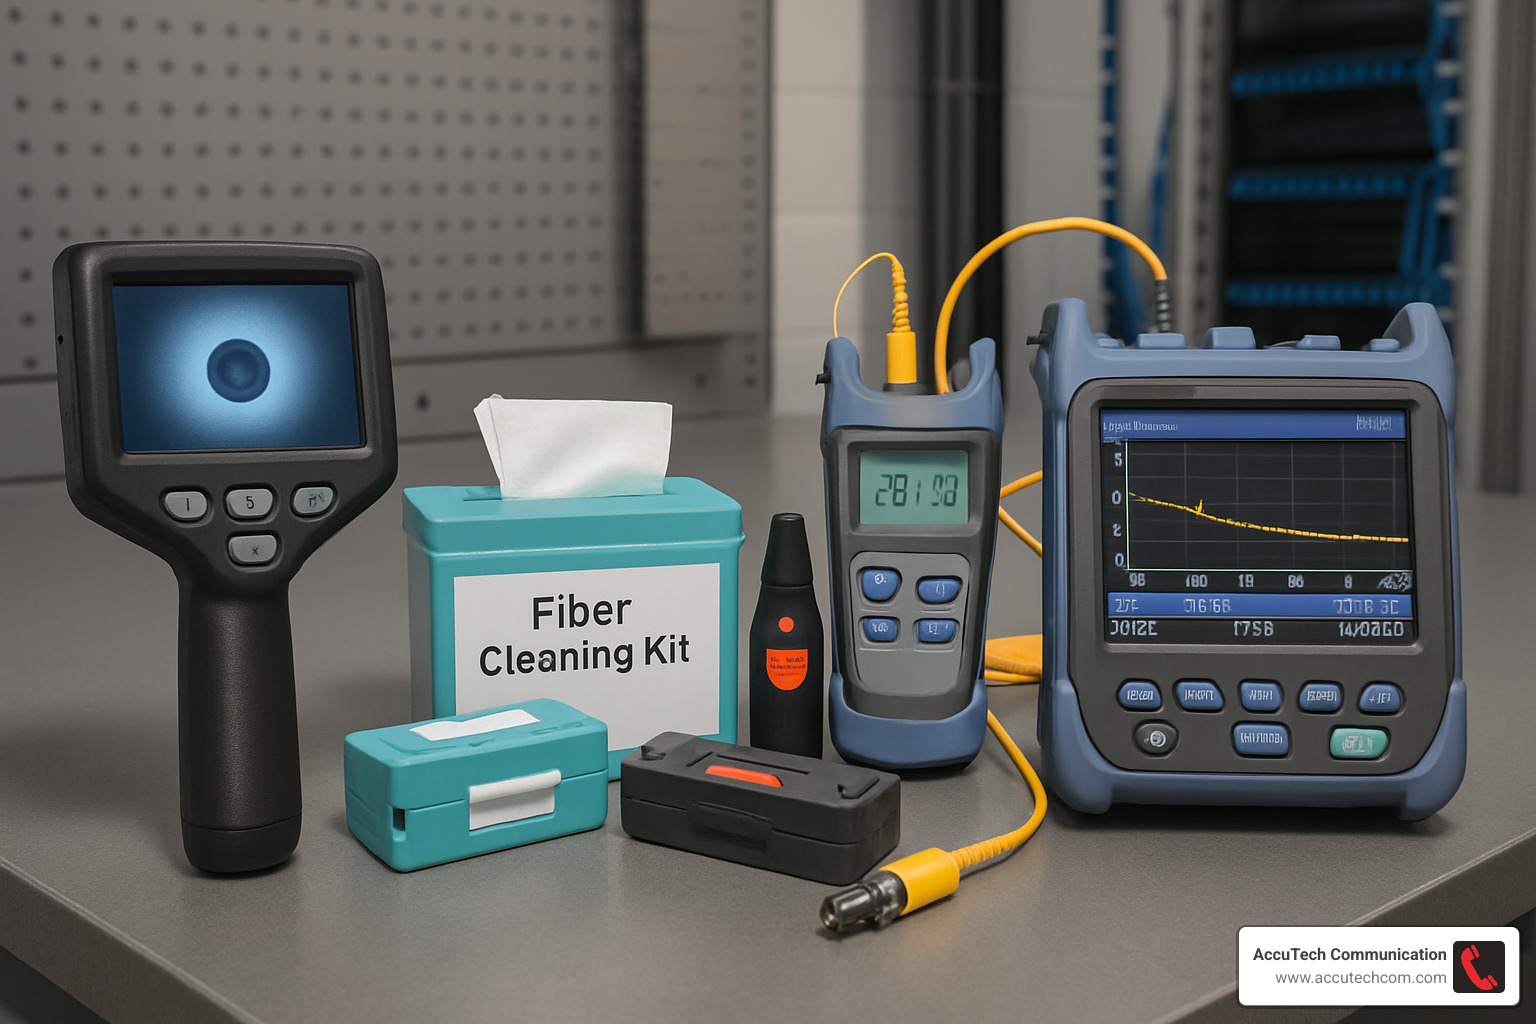
Essential Maintenance Tools
You wouldn’t try to change a tire without a jack, and you shouldn’t maintain fiber panels without the right tools. Here’s what should be in your fiber maintenance toolkit:
A good fiber inspection scope is absolutely essential—it’s your eyes into the microscopic world of fiber end faces. Pair this with a proper fiber cleaning kit (those generic alcohol wipes from the first-aid kit won’t cut it!).
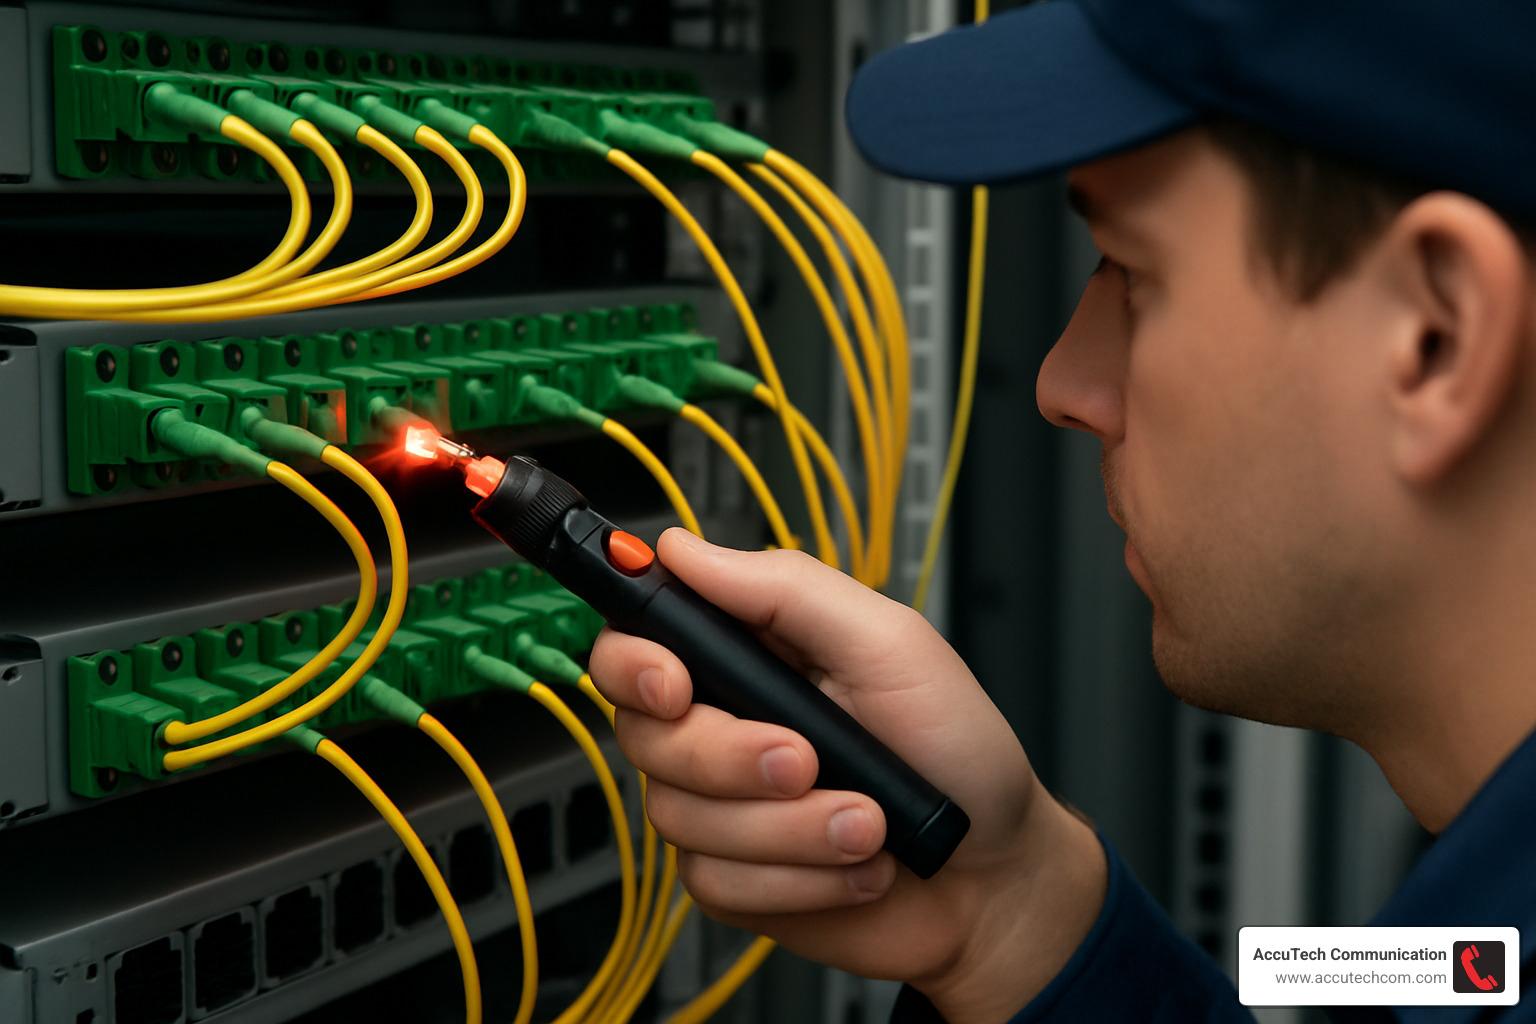
For troubleshooting, a Visual Fault Locator (VFL) is worth its weight in gold. This handy red laser tool helps you quickly spot breaks or excessive bends in your fibers. For more precise measurements, an Optical Power Meter helps identify signal degradation before it becomes service-impacting.
For larger installations or more complex problems, consider having access to an OTDR (Optical Time Domain Reflectometer). Think of it as an ultrasound for your fiber—it can pinpoint exactly where along a fiber run a problem exists.
Troubleshooting Common Issues
When something goes wrong with your fiber optic patch panel connections, don’t panic. A methodical approach usually solves the problem quickly.
If you’re experiencing complete loss of signal or high attenuation, start with the basics—clean those connector end faces at both the patch panel and equipment ends. You’d be amazed how often this simple step resolves issues. Next, examine patch cords for damage and verify you’re using the correct fiber type (mixing single-mode and multi-mode is a common mistake). Use your power meter to check optical levels, and if problems persist, an OTDR will help locate where along the path the issue lies.
For those frustrating intermittent connectivity problems, look for loose connections first. I once spent hours troubleshooting an intermittent link only to find a connector that wasn’t fully seated in its adapter! Also check for cables under tension or bent too sharply—these can cause intermittent issues that are hard to track down. When in doubt, swap in a known-good patch cord to isolate the problem.
If multiple ports fail simultaneously, think bigger—inspect the panel for physical damage, check upstream connections, verify power to any active equipment, and consider environmental factors like extreme temperatures, humidity, or vibration.
When to Consider Replacement or Upgrade
Even the most reliable fiber optic patch panels eventually need replacement or upgrades. Watch for these telltale signs:
Physical damage to housings, broken latches, or cracked adapter panels shouldn’t be ignored—they compromise the protection of your delicate fiber connections. Similarly, connector wear becomes an issue after hundreds of connection cycles, as sleeve alignment becomes less precise and signal loss increases.
Capacity limitations are perhaps the most common reason for upgrades. When you’re consistently running out of ports or need to support higher fiber counts, it’s time to consider expanding your panel infrastructure.
Technology changes often drive replacement needs. I’ve helped many Boston-area clients upgrade from 1G to 10G to 40G/100G networks, which sometimes requires different connector types or higher-grade components. Similarly, when your panels can’t support the performance needed for newer applications, replacement becomes necessary.
At AccuTech Communications, we’ve guided countless clients through strategic upgrades that minimize disruption while enhancing capabilities across Massachusetts, New Hampshire, and Rhode Island.
More info about How to Terminate Fiber Optic Cable
Quick-Fix Playbook
Sometimes you need immediate solutions while waiting for permanent fixes. Here are some battle-tested techniques:
When faced with no light detection, grab your visual fault locator to verify continuity through the fiber. If that checks out, try swapping the patch cord with one you know works. Double-check that connectors are properly seated in adapters—sometimes they feel clicked in but aren’t fully engaged. Finally, verify the light source is active and connected to the correct port (it happens to the best of us!).
For high loss measurements, always start by cleaning connector end faces with appropriate tools. Next, check for macro-bends in the fiber path—I once found a fiber cable pinched under a rack leg causing massive signal loss! Verify you’re using matching connector types (mixing APC and UPC connectors is a recipe for problems) and confirm you’re using compatible fiber types.
If you find damaged adapters, you can often replace individual adapters rather than the entire panel—a huge cost and time saver. Check those alignment pins in adapters for damage, and make sure dust caps are protecting unused ports from contamination.
With these maintenance practices and troubleshooting techniques, your fiber optic patch panel investment will continue to serve your organization reliably for years to come.
Frequently Asked Questions About Fiber Patch Panels
How long does installation take for a 48-port fiber optic patch panel?
I’m often asked this question when clients are planning their network upgrades. The honest answer is: it depends on several factors.
For a standard 48-port fiber optic patch panel, our AccuTech Communications technicians typically need anywhere from 1-8 hours, depending on the termination method we’re using:
If we’re working with a pre-terminated panel using MPO/MTP trunk cables, we can usually have you up and running in just 1-2 hours. These are great for quick deployments when time is critical.
When we use fusion-spliced pigtails (which we often recommend for the best performance), the process takes about 4-6 hours. The extra time pays off in superior connection quality and lower signal loss.
Field-terminated connectors are the most time-intensive option at 6-8 hours, but sometimes they’re the right choice for specific installation constraints.
These timeframes include everything from mounting the panel and routing cables to testing each connection and applying our detailed labeling system. Of course, if your server room looks like a spaghetti factory or we need to steer challenging cable pathways, we might need a bit more time.
The good news? For most of our clients throughout Massachusetts and New Hampshire, we can complete standard installations within a single business day, minimizing any disruption to your operations. We’re all about getting you connected with minimal downtime.
When should I upgrade to a high-density fiber optic patch panel?
You know it’s time to consider a high-density fiber optic patch panel when your IT manager starts muttering about “rack space” in their sleep. But more specifically, here are the telltale signs:
Your rack space is becoming prime real estate. High-density panels can reduce your space requirements by up to 50% compared to traditional panels. That’s like getting a free half-rack!
You’re making the jump to 40G/100G networks. These higher speeds typically require MPO/MTP connectors, which high-density panels are designed to support. Think of it as upgrading from a country road to an expressway – you need the right infrastructure.
Your fiber connections are exceeding 72 ports per rack unit. At this point, traditional panels simply can’t keep up, and high-density options become a necessity rather than a luxury.
You’re consolidating your data center. Many of our Boston clients have used high-density panels to maintain the same connectivity while significantly reducing their footprint – sometimes by 30-40%. This not only saves space but can reduce cooling costs too.
Your cable management has become a nightmare. The advanced organization features in high-density panels can transform chaos into order, making maintenance and troubleshooting much more efficient.
I’ve personally helped numerous clients in Boston’s financial district make this transition, and the difference in their rack organization is like night and day. One client told me they finally felt comfortable showing off their server room to visitors instead of quickly closing the door before anyone could see inside!
Can I mix single-mode and multi-mode fibers in the same panel?
Yes, you can mix single-mode and multi-mode fibers in the same fiber optic patch panel – but should you? It’s a bit like asking if you can keep both cats and dogs in the same house. Technically yes, but you need to set some ground rules to avoid chaos.
If you do decide to mix fiber types, here’s how to do it safely:
Always use clearly differentiated adapters. This is your first line of defense against incorrect connections. Single-mode adapters are typically blue or green (APC), while multi-mode adapters come in aqua (OM3/OM4), orange (OM1/OM2), or lime green (OM5). These color differences are your visual cue to prevent mixing up connections.
Label everything carefully. I can’t stress this enough – clear labels on each port indicating the fiber type will save you countless headaches down the road. Your future self (or the next network administrator) will thank you.
Consider using panels specifically designed with separate sections for different fiber types. Some manufacturers make these hybrid panels to help keep things organized.
Be aware that mixing increases the risk of confusion. Even with the best labeling system, there’s always a chance someone might connect the wrong fiber types during late-night emergency maintenance.
Document your setup thoroughly. Maintain detailed records of which ports contain which fiber types, preferably both digitally and in a binder near the panel.
While mixing is possible, I generally recommend using separate panels whenever feasible. This approach creates a physical separation that significantly reduces the risk of errors.
For our clients with severe space constraints in locations like Sudbury or Woburn, we’ve designed hybrid solutions that safely accommodate both fiber types. One manufacturing client had us create a custom color-coded labeling system with a panel diagram posted inside their server room door – no confusion since!
The goal isn’t just to make connections; it’s to create a network infrastructure that remains reliable and manageable for years to come.
Conclusion
As we’ve explored throughout this guide, fiber optic patch panels are truly the backbone of a well-designed, future-ready network infrastructure. They’re not just metal boxes with adapters—they’re the critical junction points that keep your data flowing reliably day after day.
When you’re making your final decision about which panel is right for your organization, remember these key insights:
First, choose the right form factor that matches where you’ll be installing it. A sleek rack-mount panel works beautifully in your data center, while a sturdy wall-mount enclosure might be perfect for that cramped telecom closet in your satellite office. And for those challenging outdoor or industrial environments, specialized rugged enclosures will protect your valuable fiber connections from whatever Mother Nature throws their way.
Always plan for growth—because your network certainly will grow! The panels you install today should have room to accommodate tomorrow’s expansion. This is where high-density options really shine, offering up to 144 LC ports in just 2U of rack space. That’s a lot of connectivity in a small footprint!
I’ve seen how quality components make all the difference in network reliability. Premium adapters, thoughtful cable management features, and robust enclosures might cost a bit more upfront, but they pay for themselves many times over through reduced downtime and simpler maintenance over the years.
Your installation practices matter tremendously. Proper cable routing, careful attention to strain relief points, and comprehensive labeling aren’t just nice-to-haves—they’re essential for a system you can actually maintain when changes are needed (and changes are always needed!).
Don’t forget that even the best fiber optic patch panels need regular care. Implementing a simple maintenance schedule with periodic inspections and cleaning will keep your fiber infrastructure performing at its best year after year.
Here at AccuTech Communications, we’ve been designing, installing, and maintaining fiber optic networks across Massachusetts, New Hampshire, and Rhode Island since 1993. Our certified technicians understand the unique challenges of New England environments—from historic buildings in Boston to manufacturing facilities in Worcester and the diverse business landscapes of Marlborough, Sudbury, and Waltham.
We take genuine pride in delivering certified, reliable service with competitive pricing and an unwavering commitment to quality. Whether you need a single wall-mount panel for a small office or a comprehensive data center infrastructure with hundreds of fiber connections, we have the expertise to ensure your project succeeds.
Ready to improve your network with the right fiber optic patch panel solution? We’d love to help. Contact AccuTech Communications today for a consultation custom to your specific needs. Our team will help you select, install, and maintain the perfect fiber infrastructure to connect your business to the future.
More info about Certified Fiber Optic Technician services