How to Install Low Voltage Deck Lighting: 3 Easy Steps
Transform Your Outdoor Space with Professional Low-Voltage Lighting
How to install low voltage deck lighting is a rewarding DIY project that can transform your outdoor space into a beautiful, functional area for evening entertaining. Here’s the essential process:
- Plan your lighting layout – Sketch your deck and mark fixture locations
- Size your transformer – Calculate total wattage and add 10-25% for line loss
- Choose your wiring method – Select from straight run, loop, or T-layout configurations
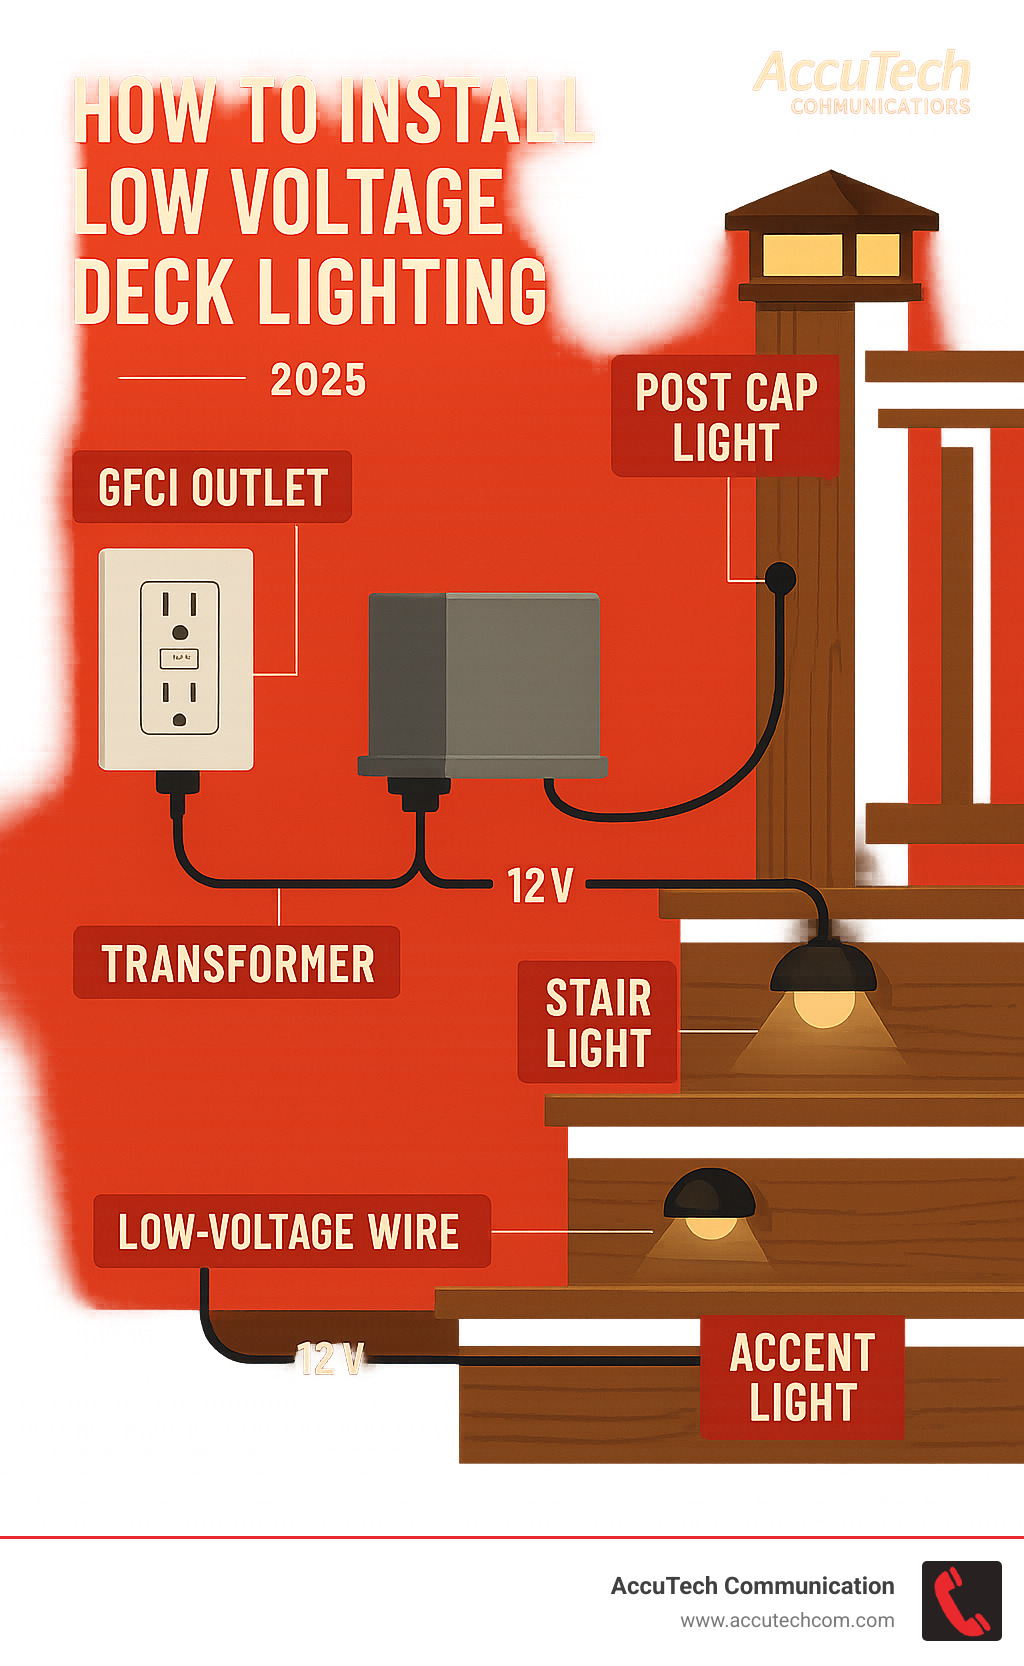
- Install the transformer – Mount near a GFCI outlet, protected from weather
- Run low-voltage wire – Hide cables under decking or in post sleeves
- Connect fixtures – Install post cap, stair, and accent lights with waterproof connections
- Test the system – Check voltage at each fixture and troubleshoot any issues
Low-voltage deck lighting operates on just 12 volts, making it much safer than standard household wiring. The system uses a transformer to step down your home’s 120-volt power to safe 12-volt current. This means you can work with the wiring without the same safety concerns as line-voltage electrical work.
As Scott Caron, electrician for Ask This Old House, notes: “Low-voltage lighting is very DIY-friendly. The thin wiring is easy to hide on or under the deck.”
The benefits go beyond safety. LED deck lights typically last 20,000 to 50,000 hours and consume minimal electricity. Most systems use simple plug-and-play connections that make installation straightforward, even for beginners.
I’m Corin Dolan, owner of AccuTech Communications, and I’ve been helping businesses and homeowners with low-voltage installations across Massachusetts, New Hampshire, and Rhode Island since 1993. While my expertise spans complex network cabling systems, the principles of how to install low voltage deck lighting follow many of the same best practices for safe, reliable electrical connections.
Planning and Preparation: The Foundation for Success

Designing your lighting layout is the single most important step in how to install low voltage deck lighting. A clear plan prevents dark spots, minimizes voltage-drop headaches, and makes the rest of the job faster.
Start by sketching your deck on graph paper. Mark every post, stair, and feature you want to highlight. Then drop in fixture symbols—circles for post caps, rectangles for stair lights, triangles for spotlights. This bird’s-eye view instantly reveals where you need more or less light.
Choosing Your Lights and Creating a Layout
Common low-voltage fixtures include:
- Post cap lights – ambient glow that defines the deck perimeter
- Stair riser lights – critical for nighttime safety
- Recessed in-deck lights – flush-mounted floor accents
- Under-rail lights – even, glare-free surface wash
- Accent spotlights – focus on planters or architectural details
Reference the Figure A: Low-voltage deck lighting plan to see how professionals layer these fixtures.
Sizing Your Transformer and Wire
- Add up fixture wattage and add 10-25 % for line loss.
- Choose the next larger transformer so you can expand later.
- Use DC transformers for LEDs and AC for incandescent—don’t mix.
- Match wire gauge to run length and load. Most LED jobs use 18/2 AWG; long or high-load runs may need 14/2 or 12/2.
For direct-burial routes or Underground Electrical Conduit installations, always use UF-rated cable.
Selecting the Right Wiring Layout
- Straight run (daisy chain) – simplest; best for short lines.
- T-layout – transformer in the middle; halves maximum run length.
- Split load – multiple circuits from one transformer for independent zones.
- Loop – wire forms a complete circle fed from both ends; offers the most stable voltage on large decks.
Good routing keeps any single run under about 200 ft to avoid voltage drop.
Gathering Your Tools and Materials
- Power drill with forstner and hole-saw bits
- Wire strippers and multimeter
- Low-voltage landscape wire
- Waterproof wire connectors or heat-shrink tubing
- Plastic cable staples (never metal)
- Silicone sealant
Quality connectors are cheap insurance—poor connections are the #1 cause of lighting failures. For professional, long-lasting joints, use Waterproof wire connectors for direct burial.
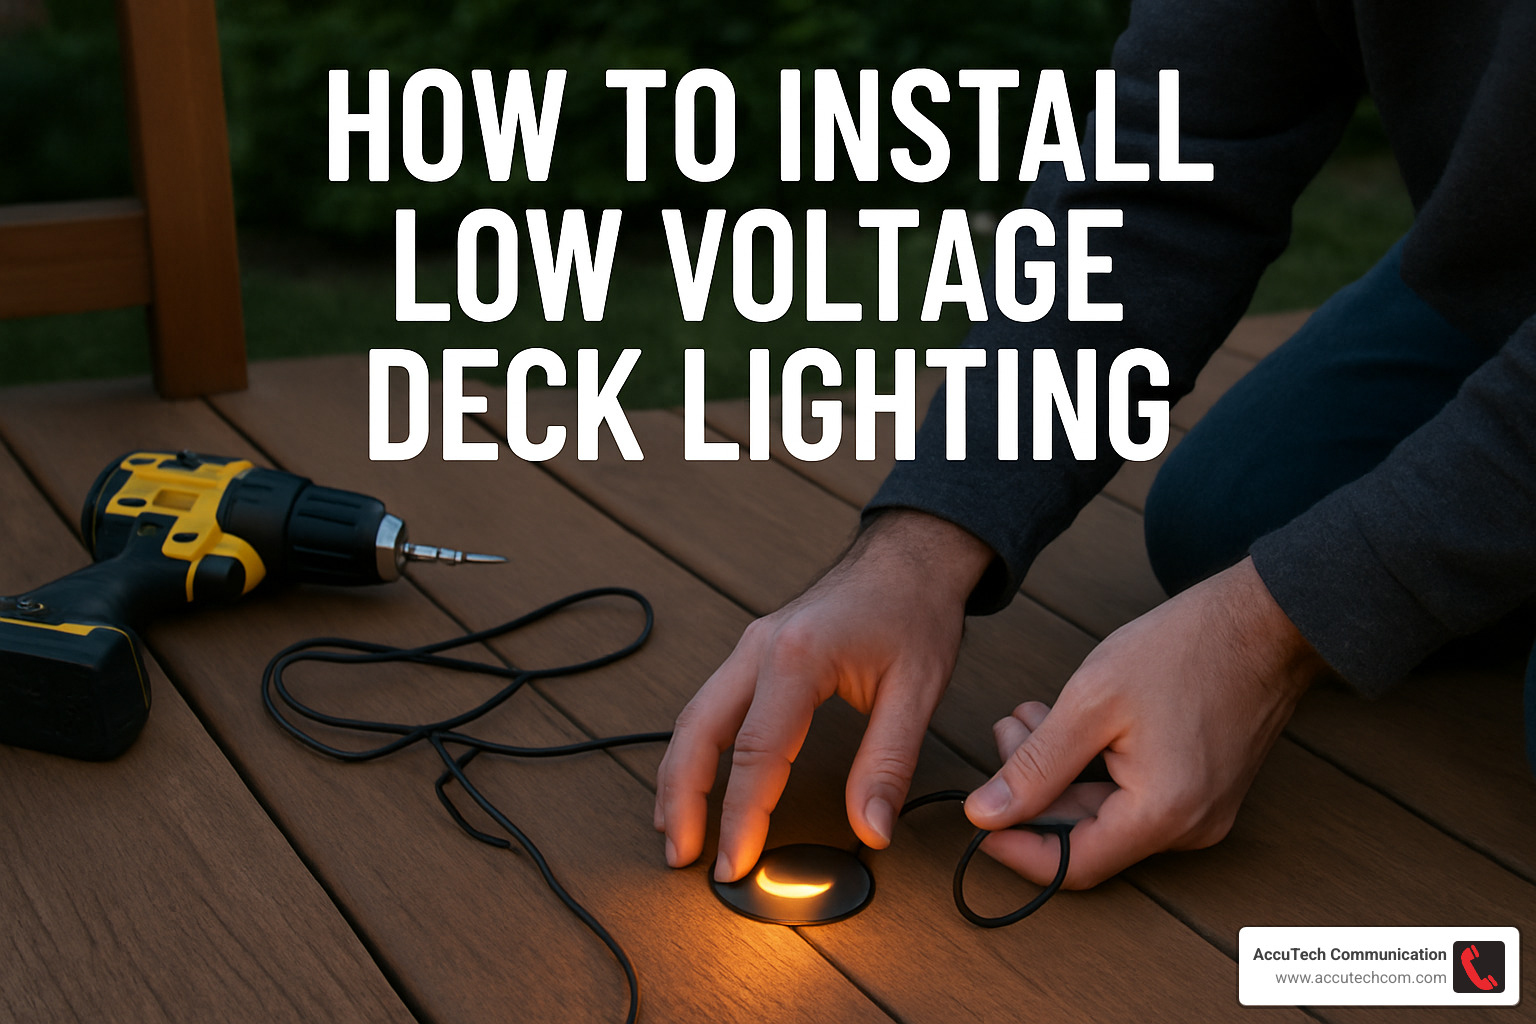
Your Step-by-Step Guide on How to Install Low Voltage Deck Lighting

Now comes the fun part – actually installing your lights! The beauty of how to install low voltage deck lighting is that you’re working with safe 12-volt power instead of dangerous household current. Still, we always recommend following proper safety procedures and testing each connection as you go.
Before you begin, double-check that you have all your tools and materials ready. There’s nothing more frustrating than getting halfway through a connection only to realize you’re missing the right wire connector. Take a moment to organize everything – your future self will thank you.
Step 1: Install the Transformer
Your transformer is the heart of the entire system, so choosing the right location is crucial. You’ll want a spot that’s close enough to your GFCI outlet (within 6 feet is ideal) but protected from the elements. Think of it like finding the perfect spot for your outdoor grill – convenient but sheltered.
The transformer should be mounted at least 12 inches off the ground to prevent water damage during heavy rains. Make sure there’s good ventilation around it too – transformers generate heat and need airflow to stay cool. A covered area under your deck or in a garage works perfectly.
When mounting the transformer, use the provided brackets and secure them firmly. Most transformers have multiple voltage taps – usually 12V, 13V, 14V, and 15V. Start with the 12V setting for now. You can always adjust this later if you notice voltage drop issues at the end of your wire runs.
Safety first – make sure that GFCI outlet is actually GFCI-protected. You can test this by pressing the test button on the outlet. If it doesn’t trip, you’ll need an electrician to install proper GFCI protection before proceeding.
Connect your transformer to the outlet but don’t turn it on yet. We’ll energize the system only after everything is properly connected and tested.
Step 2: Run and Conceal the Main Low-Voltage Wire
This is where your installation goes from amateur to professional-looking. The secret is making all that wiring completely invisible. Nobody wants to see a bunch of wires draped around their beautiful deck like Christmas lights in July.
Running wire under the deck is usually your best bet. You’ll secure the main supply wire along the deck joists using cable staples every 2-3 feet. Here’s a pro tip from our Cabling Installation experience – use plastic cable staples, never metal ones. Metal staples can cut through wire insulation over time, especially when the deck expands and contracts with temperature changes.
For above-deck routing, you have several clever options. Hollow post sleeves are perfect for hiding wire – many composite and metal railings are designed with this in mind. If you’re working with solid wood posts, you can route channels by cutting a 3/8″ x 3/8″ groove and covering it with a thin wood strip. For a quick solution, small wire clips can hold wire along the underside of railings where it’s barely visible.
When you need to run wire through posts, drill a 1-1/2″ diameter hole in the center of the post top, then drill a smaller 3/8″ hole from the side to intersect with it. This creates a clean path for the wire while keeping the post structurally sound.
Here’s something that will save you headaches later – leave plenty of slack at each fixture location. Give yourself 6-8 inches of extra wire at every connection point. You’ll need this for making connections, and your future self will appreciate it during maintenance.
Step 3: How to Install Low Voltage Deck Lighting Fixtures
Now for the moment of truth – installing your actual lights. Here’s something that might surprise you: install with the power on. This lets you test each light as you connect it, so you’ll know immediately if something’s wrong instead of finding problems after everything’s buttoned up.
Post cap lights are usually the trickiest because they require the most precise drilling. Start by drilling that 1-1/2″ diameter center hole about 5″ deep in your post top. Then drill your intersecting 3/8″ hole from the side. Pull your main wire through, leaving that 6″ of slack we talked about.
Strip the wire ends about 3/4″ and connect them to the fixture leads. Pay attention to polarity – the smooth wire connects to smooth, ribbed to ribbed. LED lights won’t work if you get this backwards, though you won’t damage anything. Use waterproof wire nuts or heat-shrink connections for a professional job.
Stair riser lights are more forgiving. Mark your location about 4″ above each stair tread, drill your mounting holes and wire access hole, then connect the fixture wires to your main circuit. These lights are all about safety, so make sure they’re positioned where they’ll actually illuminate the step edge.
Recessed lights require a 2″ hole saw to cut through the deck board. Here’s a tip – size the hole for easy insertion when the deck is warm. Deck boards expand in summer heat, and you don’t want your lights binding up. Feed the wire through the fixture, connect to your main circuit, and test fit everything before final installation.
For all LED fixtures, polarity matters. The smooth black wire typically goes to positive, while the ribbed or lettered wire connects to negative. If an LED doesn’t light up, try reversing the connections before assuming there’s a bigger problem.
Quality waterproof connections are non-negotiable for outdoor installations. Heat-shrink tubing provides much better long-term protection than electrical tape, which can fail in summer heat and leave your connections exposed to moisture.
Testing, Troubleshooting, and Maintenance
Once all fixtures are installed, it’s time for comprehensive system testing. This step separates successful installations from problematic ones.
Testing Your System and Troubleshooting Common Issues
Start by checking voltage at the transformer with a multimeter. You should read 12-15 volts depending on your tap setting. Then check voltage at each fixture, working from closest to farthest from the transformer.
Voltage at fixtures should be 11.5-12.5 volts for proper operation. If you’re reading less than 11 volts, you likely have voltage drop issues. Common causes include:
- Wire gauge too small for the load
- Connections with high resistance
- Wire runs that are too long
- Overloaded circuits
Troubleshooting dim or flickering lights:
- Check all connections for corrosion or looseness
- Verify proper polarity on LED fixtures
- Test individual fixture operation by connecting directly to transformer
- Measure voltage drop across each connection
If lights work intermittently, you probably have a moisture problem. Check all connections and ensure they’re properly sealed with heat-shrink tubing or waterproof connectors.
The principles we use for 5 Common Mistakes to Avoid When Installing Network Cabling apply here too – proper connections, adequate wire gauge, and protection from environmental factors are crucial for long-term reliability.
Long-Term Maintenance and Care
Low-voltage deck lighting requires minimal maintenance, but regular attention keeps your system looking and performing its best.
Monthly tasks:
- Clean fixtures with a damp cloth and mild soap
- Check for loose connections or damaged wires
- Verify all lights are operating
Seasonal maintenance:
- Inspect wire connections for corrosion
- Check transformer cooling vents for debris
- Tighten any loose mounting hardware
- Apply silicone sealant to connections showing wear
Annual tasks:
- Test GFCI outlet operation
- Check wire insulation for damage from pests
- Replace any failed bulbs or fixtures
- Update timer settings for seasonal changes
Protect wiring from pest damage by using conduit in vulnerable areas. Squirrels and other animals can chew through wire insulation, causing shorts and system failures.
Upgrading Your System with Smart Technology
Once you’ve mastered how to install low voltage deck lighting, the next exciting step is making your system smarter. Modern technology has transformed simple lighting into sophisticated control systems that respond to your lifestyle and preferences.
Smart transformers are game-changers for deck lighting. These advanced units include built-in timers, dimming capabilities, and even smartphone connectivity. Instead of manually turning lights on each evening, your system can automatically adjust brightness levels throughout the night – bright for dinner preparation, dimmed for conversation, and off at bedtime.
Wi-Fi smart plugs offer an affordable entry point into smart lighting control. Simply plug your existing transformer into a smart plug, and suddenly you have smartphone control from anywhere. Set schedules, create lighting scenes, and even integrate with voice assistants like Alexa or Google Home. “Turn on the deck lights” becomes as simple as speaking the command.
Motion sensors add both convenience and security to your lighting system. Install them near stairs and entry points to automatically illuminate pathways when someone approaches. The lights turn off after a preset time, saving energy while ensuring safety. This feature is particularly valuable for late-night trips outside or when guests are navigating unfamiliar spaces.
Smart dimmers take ambiance control to the next level. Start your evening with bright task lighting for grilling and dining, then gradually dim to soft ambient levels as the night progresses. Many smart dimmers can be programmed to follow sunset schedules, automatically adjusting throughout the seasons.
For homeowners with comprehensive automation systems, deck lighting can integrate seamlessly with existing technology. Modern CCTV Security Camera systems can trigger lighting based on motion detection, creating a coordinated security response that illuminates areas of concern.
Timers remain one of the most practical upgrades. Whether built into smart transformers or added as separate components, timers ensure your lights operate consistently without daily intervention. Set different schedules for weekdays and weekends, or create seasonal programs that adjust for changing daylight hours.
The beauty of smart technology is that it can be added gradually. Start with a simple timer or smart plug, then expand your system as you find new possibilities. Many homeowners find that once they experience the convenience of automated lighting, they wonder how they ever managed without it.
Frequently Asked Questions about Deck Lighting Installation
How much does it cost to install low voltage deck lighting?
The investment for how to install low voltage deck lighting varies widely based on your fixture choices and project scope. Basic LED fixtures offer great value for most homeowners, while premium fixtures provide improved durability and unique design features for those wanting something special.
Your transformer represents another significant component cost, with capacity and smart features affecting the price. Higher-wattage transformers cost more but give you room to expand your system later.
Don’t forget about the “hidden” costs – wire, connectors, and installation materials can add up quickly. Quality waterproof connections are worth the investment since they prevent costly failures down the road.
The real beauty of DIY installation is avoiding professional labor costs, which can easily double or triple your total project expense. Most homeowners find the installation process rewarding and well within their skill level.
Do I need an electrician to install low-voltage lighting?
Here’s the good news – 12-volt systems are generally safe for DIY installation and don’t require permits in most areas. The low voltage makes it much safer than working with household electrical systems.
However, there’s one important exception: if you need a new 120V GFCI outlet for your transformer, that work requires a licensed electrician. The outlet installation involves household voltage and must meet local electrical codes.
Once you have a proper GFCI outlet, the rest of the project is DIY-friendly. The transformer plugs in like any appliance, and all the fixture wiring operates at safe 12-volt levels.
When should you consider calling a professional? If you’re uncomfortable with any aspect of the installation, have a complex multi-zone system, or want integration with existing home automation systems, professional help can save time and ensure optimal results.
How do you hide low voltage wires on a deck?
Wire concealment separates amateur installations from professional-looking results. The secret is planning your wire routes during the design phase, not as an afterthought.
Running wire underneath deck boards along the joists creates the cleanest look. Use plastic cable staples every few feet to secure the wire, but avoid metal staples that can damage insulation. This method works especially well for composite decking where drilling through boards isn’t ideal.
Hollow railing posts and sleeves provide perfect wire concealment for many modern deck designs. Metal and composite railings often have built-in wire management features that manufacturers specifically designed for lighting installations.
For wooden posts, routing shallow channels works beautifully. Cut a 3/8″ x 3/8″ groove along the post, run your wire, then cover with a thin wood strip. This technique requires more work but creates an invisible installation.
Wire clips under railings offer a simple solution when other methods aren’t practical. Choose clips that match your railing color and space them evenly for a neat appearance.
The key is using proper fasteners that won’t damage wire insulation over time. Plastic clips and staples expand and contract with temperature changes, while metal fasteners can cut through insulation and cause shorts.
Remember to leave service loops at each fixture location – you’ll appreciate the extra wire when maintenance time comes around.
Conclusion
There’s something magical about stepping onto a beautifully lit deck on a warm evening. The gentle glow of how to install low voltage deck lighting transforms an ordinary outdoor space into an inviting retreat where memories are made.
You’ve learned that this project combines the best of both worlds – impressive results with manageable complexity. The 12-volt system is inherently safe for DIY installation, while LED technology keeps energy costs minimal and maintenance to a minimum. Most homeowners find the installation process rewarding rather than overwhelming.
The foundation of any successful lighting project is thorough planning and quality components. Your time spent sketching layouts, calculating transformer requirements, and selecting proper wire gauges pays dividends in system performance and longevity. Voltage drop is your biggest enemy – plan wire runs carefully and don’t skimp on wire gauge for longer distances.
Professional-looking results come from attention to detail. Take time to properly conceal wiring, use quality waterproof connections, and test thoroughly as you go. The extra effort spent on clean installation techniques separates amateur work from professional-grade results.
One of the best aspects of low-voltage lighting is its forgiving nature. Mistakes rarely cause damage, and troubleshooting is straightforward with a basic multimeter. Start with a simple installation and expand your system as your confidence grows. Many homeowners find themselves adding fixtures year after year as they find new ways to improve their outdoor space.
The technology continues to evolve too. Smart controls and automation options mean your basic installation can grow into a sophisticated system that responds to your lifestyle and preferences.
For complex wiring projects or integrating deck lighting with larger home automation systems in Massachusetts, New Hampshire, or Rhode Island, the certified professionals at AccuTech Communications can ensure a reliable and high-quality installation. Our three decades of experience with low-voltage systems means we understand the nuances that make the difference between a system that works and one that works beautifully for years to come.
Whether you tackle this as a weekend project or need professional assistance, proper deck lighting will extend your outdoor living season and create a space your family will treasure. The investment in time and materials pays back in countless evenings of improved outdoor enjoyment.
Contact a Low Voltage Installer for your project if you need professional assistance with your installation.
